Inline Question 1
What does your final vanilla GAN image look like?
Your Answer : iteration 초기에는 검은 배경과 흐릿한 배경 형태이고, 점점 흐릿한 형태들이 보이며, 최종 출력은 절반 정도는 어느정도 인식이 가능한 형태로 나타났습니다.
Inline Question 2
What does your final LSGAN image look like?

Your Answer : 최종 출력은 Vanilla GAN에 비해 인식 가능한 이미지가 많아진 것 같고, 흐릿한 형태의 숫자들이 어느정도 밀접한 군집의 형태로 나타났습니다.
Inline Question 3
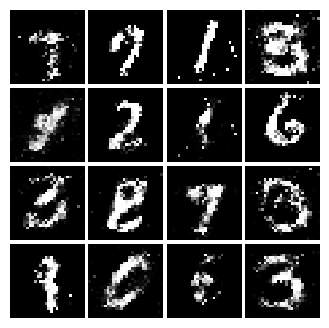
What does your final DCGAN image look like?

Your Answer : 최종 출력은 Vanilla GAN, LSGAN에 비해 흐릿한 영역이 많이 없어졌으며, 대부분이 실제 사람이 쓴 숫자처럼 나타났습니다. 많은 숫자들을 인식하는 것이 가능해보입니다.
Inline Question 4
We will look at an example to see why alternating minimization of the same objective (like in a GAN) can be tricky business.
Consider $f(x,y)=xy$. What does $min_xmax_yf(x,y)$ evaluate to? (Hint: minmax tries to minimize the maximum value achievable.)
Now try to evaluate this function numerically for 6 steps, starting at the point (1,1), by using alternating gradient (first updating y, then updating x using that updated y) with step size 1. Here step size is the learning_rate, and steps will be learning_rate * gradient. You'll find that writing out the update step in terms of $x_t, y_t, x_{t+1}, y_{t+1}$ will be useful. Breifly explain what $min_xmax_yf(x,y)$ evaluates to and record the six pairs of explicit values for $(x_t,y_t)$ in the table below.
Your Answer :

Inline Question 5
Using this method, will we ever reach the optimal value? Why or why not?
Your Answer : 아니요. 이 예제에서는 6번의 반복으로 cycle이 발생합니다. 따라서, 최적값에 도달하지 못 하고 계속해서 initial point를 진동하게 됩니다.
Inline Question 6
If the generator loss decreases during training while the discriminator loss stays at a constant high value from the start, is this a good sign? Why or why not? A qualitative answer is sufficient.
Your Answer : 아니요. 이상적인 상황은 Generator와 Discriminator가 서로 경쟁하며, 두 모델의 성능이 같이 개선되어야 합니다. Discriminator의 성능이 향상되지 않으면, Generator 또한 학습을 통해 성능이 개선되기 힘들 것 입니다.
Code
noise를 생성하는 함수입니다. torch.rand는 0~1 사이의 난수를 생성하기 때문에 (-1 ,1) 범위를 가지기 위해서 (2*난수 - 1)를 return 해줍니다.
def sample_noise(batch_size, dim, seed=None):
    """
    Generate a PyTorch Tensor of uniform random noise.

    Input:
    - batch_size: Integer giving the batch size of noise to generate.
    - dim: Integer giving the dimension of noise to generate.

    Output:
    - A PyTorch Tensor of shape (batch_size, dim) containing uniform
      random noise in the range (-1, 1).
    """
    if seed is not None:
        torch.manual_seed(seed)

    # *****START OF YOUR CODE (DO NOT DELETE/MODIFY THIS LINE)*****

    return 2 * torch.rand(batch_size, dim) - 1 # torch.rand: 0 ~ 1 사이 난수 생성

    # *****END OF YOUR CODE (DO NOT DELETE/MODIFY THIS LINE)*****
입력 이미지를 Real(1), Fake(0)로 분류하는 Discriminator 함수입니다.
입력 이미지 Feature들을 Linear Layer를 통해 1개의 Feature로 만듭니다. 이 1개의 Feature를 통해 이미지가 Real(1)인지, Fake(0) 인지 구분할 수 있습니다.
def discriminator(seed=None):
    """
    Build and return a PyTorch model implementing the architecture above.
    """

    if seed is not None:
        torch.manual_seed(seed)

    model = None

    ##############################################################################
    # TODO: Implement architecture                                               #
    #                                                                            #
    # HINT: nn.Sequential might be helpful. You'll start by calling Flatten().   #
    ##############################################################################
    # *****START OF YOUR CODE (DO NOT DELETE/MODIFY THIS LINE)*****

    model = nn.Sequential(
      Flatten(),
      nn.Linear(784, 256),
      nn.LeakyReLU(0.01),
      nn.Linear(256, 256),
      nn.LeakyReLU(0.01),
      nn.Linear(256, 1)
    )

    # *****END OF YOUR CODE (DO NOT DELETE/MODIFY THIS LINE)*****
    ##############################################################################
    #                               END OF YOUR CODE                             #
    ##############################################################################
    return model
Noise로부터 이미지를 생성하는 Generator 함수입니다. Linear Layer를 통해 [batch, 784] 로 변환합니다. 784는 추후 28*28 이미지로 reshape하여 시각화합니다.
def generator(noise_dim=NOISE_DIM, seed=None):
    """
    Build and return a PyTorch model implementing the architecture above.
    """

    if seed is not None:
        torch.manual_seed(seed)

    model = None

    ##############################################################################
    # TODO: Implement architecture                                               #
    #                                                                            #
    # HINT: nn.Sequential might be helpful.                                      #
    ##############################################################################
    # *****START OF YOUR CODE (DO NOT DELETE/MODIFY THIS LINE)*****

    model = nn.Sequential(
      nn.Linear(noise_dim, 1024),
      nn.ReLU(),
      nn.Linear(1024,1024),
      nn.ReLU(),
      nn.Linear(1024, 784),
      nn.Tanh()
    )

    # *****END OF YOUR CODE (DO NOT DELETE/MODIFY THIS LINE)*****
    ##############################################################################
    #                               END OF YOUR CODE                             #
    ##############################################################################
    return model
Discriminator와 Generator의 loss 함수입니다.
각각의 loss는 다음과 같습니다.
$$\ell_G = -\mathbb{E}_{z \sim p(z)}\left[\log D(G(z))\right]$$
$$ \ell_D = -\mathbb{E}_{x \sim p_\text{data}}\left[\log D(x)\right] - \mathbb{E}_{z \sim p(z)}\left[\log \left(1-D(G(z))\right)\right]$$
loss에 사용되는 bce_loss는 다음과 같습니다.
$$ bce(s, y) = -y * \log(s) - (1 - y) * \log(1 - s) $$
s는 sigmoid(input), y는 target 입니다. 실제로는 코드에서 BCEwithLogitsLoss(=BCE(Sigmoid(input))를 사용하면서 입력 값이 0~1 일 필요가 없습니다. s와 y가 같은 값이면 loss는 0, 다를 수록 loss가 증가합니다.
def discriminator_loss(logits_real, logits_fake):
    """
    Computes the discriminator loss described above.

    Inputs:
    - logits_real: PyTorch Tensor of shape (N,) giving scores for the real data.
    - logits_fake: PyTorch Tensor of shape (N,) giving scores for the fake data.

    Returns:
    - loss: PyTorch Tensor containing (scalar) the loss for the discriminator.
    """
    loss = None
    # *****START OF YOUR CODE (DO NOT DELETE/MODIFY THIS LINE)*****

    logits_real = logits_real.reshape(-1)
    logits_fake = logits_fake.reshape(-1)

    loss = bce_loss(logits_real, torch.ones(logits_real.size()).type(dtype)) + bce_loss(logits_fake, torch.zeros(logits_fake.size()).type(dtype))

    # *****END OF YOUR CODE (DO NOT DELETE/MODIFY THIS LINE)*****
    return loss

def generator_loss(logits_fake):
    """
    Computes the generator loss described above.

    Inputs:
    - logits_fake: PyTorch Tensor of shape (N,) giving scores for the fake data.

    Returns:
    - loss: PyTorch Tensor containing the (scalar) loss for the generator.
    """
    loss = None
    # *****START OF YOUR CODE (DO NOT DELETE/MODIFY THIS LINE)*****

    logits_fake = logits_fake.reshape(-1)

    loss = bce_loss(logits_fake, torch.ones(logits_fake.size()).type(dtype))

    # *****END OF YOUR CODE (DO NOT DELETE/MODIFY THIS LINE)*****
    return loss
Optimizer를 return하는 함수입니다. (설명 생략)
def get_optimizer(model):
    """
    Construct and return an Adam optimizer for the model with learning rate 1e-3,
    beta1=0.5, and beta2=0.999.

    Input:
    - model: A PyTorch model that we want to optimize.

    Returns:
    - An Adam optimizer for the model with the desired hyperparameters.
    """
    optimizer = None
    # *****START OF YOUR CODE (DO NOT DELETE/MODIFY THIS LINE)*****

    learning_rate = 1e-3
    beta1 = 0.5
    beta2 = 0.999

    optimizer = optim.Adam(model.parameters(), lr = learning_rate, betas = (beta1, beta2))

    # *****END OF YOUR CODE (DO NOT DELETE/MODIFY THIS LINE)*****
    return optimizer
Least Squares GAN 에서 소개하는 Generator와 Discriminator의 loss 입니다.
$$\ell_G = \frac{1}{2}\mathbb{E}_{z \sim p(z)}\left[\left(D(G(z))-1\right)^2\right]$$
and the discriminator loss:
$$ \ell_D = \frac{1}{2}\mathbb{E}_{x \sim p_\text{data}}\left[\left(D(x)-1\right)^2\right] + \frac{1}{2}\mathbb{E}_{z \sim p(z)}\left[ \left(D(G(z))\right)^2\right]$$
수식을 그대로 코드로 옮겼으며, 논문을 읽어보진 않았기 때문에 설명은 생략하겠습니다.
def ls_discriminator_loss(scores_real, scores_fake):
    """
    Compute the Least-Squares GAN loss for the discriminator.

    Inputs:
    - scores_real: PyTorch Tensor of shape (N,) giving scores for the real data.
    - scores_fake: PyTorch Tensor of shape (N,) giving scores for the fake data.

    Outputs:
    - loss: A PyTorch Tensor containing the loss.
    """
    loss = None
    # *****START OF YOUR CODE (DO NOT DELETE/MODIFY THIS LINE)*****

    loss = 0.5 * torch.mean((scores_real - 1).pow(2)) + 0.5 * torch.mean((scores_fake).pow(2))

    # *****END OF YOUR CODE (DO NOT DELETE/MODIFY THIS LINE)*****
    return loss

def ls_generator_loss(scores_fake):
    """
    Computes the Least-Squares GAN loss for the generator.

    Inputs:
    - scores_fake: PyTorch Tensor of shape (N,) giving scores for the fake data.

    Outputs:
    - loss: A PyTorch Tensor containing the loss.
    """
    loss = None
    # *****START OF YOUR CODE (DO NOT DELETE/MODIFY THIS LINE)*****

    loss = 0.5 * torch.mean((scores_fake - 1).pow(2))

    # *****END OF YOUR CODE (DO NOT DELETE/MODIFY THIS LINE)*****
    return loss
DCGAN 의 Generator와 Discriminator 입니다. 처음 작성한 Vanilla GAN의 경우 linear layer를 통해 이미지를 생성했습니다. 이제 Deep Convolution Network를 통해 이미지를 생성해봅니다. 물론 결과는 훨씬 좋습니다. (Inline Question 3)
def build_dc_classifier(batch_size):
    """
    Build and return a PyTorch model for the DCGAN discriminator implementing
    the architecture above.
    """

    ##############################################################################
    # TODO: Implement architecture                                               #
    #                                                                            #
    # HINT: nn.Sequential might be helpful.                                      #
    ##############################################################################
    # *****START OF YOUR CODE (DO NOT DELETE/MODIFY THIS LINE)*****

    model = nn.Sequential(
      Unflatten(batch_size, 1, 28, 28),
      nn.Conv2d(1, 32, 5, stride=1),
      nn.LeakyReLU(0.01),
      nn.MaxPool2d(2, stride=2),
      nn.Conv2d(32, 64, 5, stride=1),
      nn.LeakyReLU(0.01),
      nn.MaxPool2d(2, stride=2),
      Flatten(),
      nn.Linear(1024, 1024),
      nn.LeakyReLU(0.01),
      nn.Linear(1024,1)
    )

    return model
    # *****END OF YOUR CODE (DO NOT DELETE/MODIFY THIS LINE)*****
    ##############################################################################
    #                               END OF YOUR CODE                             #
    ##############################################################################


def build_dc_generator(noise_dim=NOISE_DIM):
    """
    Build and return a PyTorch model implementing the DCGAN generator using
    the architecture described above.
    """

    ##############################################################################
    # TODO: Implement architecture                                               #
    #                                                                            #
    # HINT: nn.Sequential might be helpful.                                      #
    ##############################################################################
    # *****START OF YOUR CODE (DO NOT DELETE/MODIFY THIS LINE)*****

    model = nn.Sequential(
      nn.Linear(noise_dim, 1024),
      nn.ReLU(inplace=True),
      nn.BatchNorm1d(1024),
      nn.Linear(1024, 7*7*128),
      nn.ReLU(inplace=True),
      nn.BatchNorm1d(7*7*128),
      Unflatten(),
      nn.ConvTranspose2d(128, 64, 4, stride=2, padding=1),
      nn.ReLU(inplace=True),
      nn.BatchNorm2d(64),
      nn.ConvTranspose2d(64, 1, 4, stride=2, padding=1),
      nn.Tanh(),
      Flatten()
    )

    return model
    # *****END OF YOUR CODE (DO NOT DELETE/MODIFY THIS LINE)*****
    ##############################################################################
    #                               END OF YOUR CODE                             #
    ##############################################################################
'Stanford CS231n' 카테고리의 다른 글
| CS231n Assignment 3(4) : Self-Supervised Learning for Image Classification (1) | 2024.12.20 |
|---|---|
| CS231n Assignment 3(2) : Image Captioning with Transformers (0) | 2024.12.19 |
| CS231n Assignment 3(1) : RNN_Captioning (1) | 2024.12.18 |
| CS231n Assignment2(4) : Convolutional Neural Networks (0) | 2024.12.18 |
| CS231n Assignment 2(3) : Dropout (0) | 2024.12.18 |